http://tuxgraphics.org/electronics

Tuxgraphics AVR C-programming tutorial
![[Illustration]](../../common/images2/article09043/illustration.gif)
Abstract:
This is an in introduction to programming of AVR microcontrollers using
C as a language. The avr-gcc was originally developed for Unix systems.
Today it is available for almost any system
and very widely used. This article will therefore also cover Windows. The
setup on a Mac is almost identical to Linux.
_________________ _________________ _________________
|
Hardware becomes software
Computers become smaller and more powerful. This has lead to an ongoing
revolution in the world of analog and digital electronics. Not so long
ago we were building circuits with dozens of TTL chips and many analog
components.
Todays circuits don't look like that anymore. They have just a few
analog or digital components at the input or output (e.g an
amplifier) and then there is one chip with many pins. Those chips are
however not application specific ICs. Those are usually generic
microcontrollers. More and more components are just replaced by
an algorithm and that algorithm runs probably inside a microcontroller.
Microcontrollers are at the heart of this electronic revolution.
It is a very exciting revolution and it is fun to play with those
microcontrollers. Come and have a look!
What are Microcontrollers?
A microcontroller is a small single chip computer. It has CPU, Ram and
permanent data storage on one small chip. They als have build-in counters
and analog to digital converters (ADCs) on chip. This makes it possible to
replace analog circuits with a microcontroller and some software.
What are AVR microcontrollers?
AVR microcontrollers are named after two Norvegian students (Alf-Egil
Bogen and Vegard Wollan) who invented them. AVR stands for Alf and Vegard's
Risc architecture. Today the AVR microcontrollers are produced by Atmel (http://www.atmel.com/products/avr/default.asp),
a US company. This AVR architecture makes it quite
easy to program the chip in C. The avr-gcc development environment is available as
free software. Learning by doing is probably the best way to learn. So let's start with a straight forward and easy to understand circuit.
Let's start with a simple circuit
You might have heard about Astable Multivibrators. It's an analog circuit
that can be used to get a LED to blink. Let's replace it by a
microcontroller. It's the "hello world program" equivalent in the
microcontroller world. To replace an Astable Multivibrator is of course not a big advantage because the complexity
of an Astable Multivibrator is not much higher than the equivalent
microcontroller circuit but the microcontroller circuit can easily be
extended with more LEDs. You can easily get all those LEDs to flash in
different patterns, something that would be difficult and complex with an
analog circuit.

Blinking LED circuit, click for a PDF version
You can build this circuit on a dot-matrix board or even a breadboard. AVR
microcontrollers have a built in clock. They don't necessarily need an external
crystal. Breadboards can be used for most microcontroller circuits that do not
require an external crystal.
Programming the microcontroller
Programming involves basically 3 steps. Writing the software (1). Compiling it(2)
into machine loadable format and loading it (3) into the microcontroller. The
software for our test circuit is already written. Therefore let's first
focus on how to get it into the microcontroller and later we discuss how
to write software.
A programmer is needed to program a microcontroller that comes fresh from the factory.
This programmer consists of both software and hardware.
The hardware interconnects your PC with the microcontroller. The programmer software that
we will use is called avrdude and it is available for Linux, Mac and Windows.
It is a command line controlled programmer but if you prefer mouse clicks then
you can just write a script (batch file) and include the command there. Double click
on the batch file and the programmer loads the software into the microcontroller.
If you have a PC which still has a parallel port and runs Linux then you can just
build your own programmer out of a simple cable and three protection resistors.
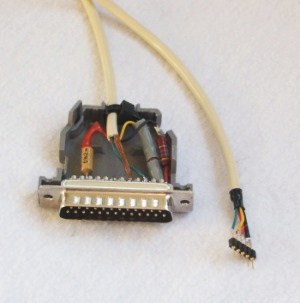
| pin on pcb |
pin on AVR |
protection resistor |
Pin on parallel port |
| 5 |
Reset (1) |
-- |
Init (16) |
| 4 |
MOSI (17) |
220 Ohm |
D0 (2) |
| 3 |
MISO (18) |
220 Ohm |
Busy (11) |
| 2 |
SCK (19) |
220 Ohm |
Strobe (1) |
| 1 |
GND |
-- |
GND (18) |
The cable should not be longer than 70cm.
This programmer has the limitation that you can use it only on circuits which
run with 5V but otherwise it is fully functional. The option in avrdude that let's
avrdude know that you will use this type of programmer is called "-c dapa".
The full command line to load software (ledtest_pre.hex) into an atmega8 chip with this parallel port programmer would be:
avrdude -p m8 -c dapa -P /dev/parport0 -e -U flash:w:ledtest_pre.hex
Most people would probably like to use something that works with any operating
system, connects via USB and works also with circuits that run not on 5V. Many
microcontroller circuits run e.g on 3.3V. The tuxgraphics avrusb500 is e.g such
a programmer. The command line option to let avrdude know that you will use this type of programmer is called "-c stk500v2" and you have to specify with the option "-P" which
is the equivalent com-port (or device in /dev for Mac and Linux). It's very easy
and there will be more details further down.
![[avrusb500 programmer]](../../common/images2/article09043/avrusb500_th.jpg)
We have now discussed the programmer hardware and I mentioned already that there
is a programmer software called avrdude. Both hardware and software work together
to get the code into the microcontroller.
How to install C-compiler and this
programmer software is described in the article Building your own avr-gcc environment with atmega328p capabilities, Linux. This article
has also a section at the end for Windows and Mac. Ready to use packages
are available for Windows and Mac. It's just a matter of downloading and installing them.
Download the avrledtest software at the end of this article.
Power up the circuit with the atmega8 (Interestingly many people tend to forget
that. Electronic circuits that work without electricity are not
invented yet ;-).
Unpack the avrledtest file and go into the directory that was created during the
unpacking. From there you issue the command:
Linux (Mac is similar):
avrdude -p m8 -c stk500v2 -P /dev/ttyUSB0 -e -U flash:w:ledtest_pre.hex
Windows:
avrdude -p m8 -c stk500v2 -P COM4 -e -U flash:w:ledtest_pre.hex
COM4 would be the equivalent comport emulated via USB. You get this information
from the hardware device manager under windows.
Mac and Linux will tell you in the kernel messages what devices to use when you plug in the
avrusb500 into the usb port. To find the right /dev device after the
avrusb500 was just plugged in you run the command dmesg and you see the kernel
messages.
I use Linux and I prefer the command line as it is faster but I understand that
the Windows dos shell is a different story. To not type the command every time and do this with a mouse click you can write a script (batch file):
@echo -------- begin winload.bat --------

set PATH=c:\avrgcc\bin;c:\avrgcc\utils\bin
REM change the com-port as needed:
set CHIP=m8
avrdude -p %CHIP%  -c stk500v2 -P COM4 -e -U flash:w:ledtest_pre.hex

@echo --------  end  --------
pause
You can also include the device name into the avrdude.conf file and
then you do not have to specify it on the command line.
Look for an option called "default_serial".
Of course it does not harm to use a script under Mac or Linux if you like.
You could also include the command in a makefile (we get to that later).
#!/bin/sh -x
# script to load code into a atmega8 (for Linux and Mac)
#
chip=m8
avrdude -p $chip -c stk500v2 -P /dev/ttyUSB0 -e -U flash:w:ledtest_pre.hex
# if you want to start it by double click in the file manager
# then uncomment the following line to keep the window open until
# you hit return:
# read
During the loading of the software with avrdude you will see a printout like this:
avrdude -p m8 -c stk500v2 -e -U flash:w:ledtest_pre.hex

avrdude: AVR device initialized and ready to accept instructions

Reading | ################################################## | 100% 0.10s

avrdude: Device signature = 0x1e9307
avrdude: erasing chip
avrdude: reading input file "ledtest_pre.hex"
avrdude: input file ledtest_pre.hex auto detected as Intel Hex
avrdude: writing flash (158 bytes):

Writing | ################################################## | 100% 0.13s

avrdude: 158 bytes of flash written
avrdude: verifying flash memory against ledtest_pre.hex:
avrdude: load data flash data from input file ledtest_pre.hex:
avrdude: input file ledtest_pre.hex auto detected as Intel Hex
avrdude: input file ledtest_pre.hex contains 158 bytes
avrdude: reading on-chip flash data:

Reading | ################################################## | 100% 0.08s

avrdude: verifying ...
avrdude: 158 bytes of flash verified

avrdude: safemode: Fuses OK

avrdude done.  Thank you.
... and you have successfully loaded the microcontroller with software.
Congratulations!
The software
The ledtest software will cause a LED on pin PC5 to blink. The algorithm to do this
would be: LED on, wait a bit, LED off, wait a bit, ....
The LED is connected between Vcc (+5V) and the pin PC5 of the microcontroller.
To switch the LED on the pin of the microcontroller needs to go to
0V (GND) and to switch it off it needs to go to +5V. We could have also
connected the LED between GND and PC5 however the output drivers of the
microcontroller can handle more current when pulling a pin to GND. With the LED
connected between Vcc and PC5 we have a current flow when the microcontroller output
pin goes to GND (0V).
Now we understand what we want to do and it is just a matter of finding the
right commands/functions.
Since we are programming hardware related functionality it is always good to
have the datasheet at hand describing that hardware: atmega8 datasheet, pdf, 2846392 bytes. What we want to do is described in chapter "I/O Ports", "Configuring the Pin, page 52".
The microcontroller has a data direction register (DDR) by setting a bit in
that register to one we configure the corresponding pin as output.
There is also a PORT register where one can set a bit to switch the
output of a pin on or off.
How to set specific bits in those registers?
This is a compiler/avr library specific question. It would be documented
under "IO definitions" the avr-libc documentation (avr-libc 1.6.4, modules).
It is implemented in the current avr-libc-1.6.X as something that looks like a variable. In older versions
(version 1.0.X) it used to be implemented as a function (sbi and cbi).
The names of those "variables" for atmega8 are found in the directory tree of your
avr-libc under <theRootDirOfAvrLibC>/avr/include/avr/iom8.h. What we need
is DDRC for the data direction register on port C and PORTC to access the port C
registers. There are also constants defined in this iom8.h file which can be
used to write
to a specific bit position (PORTC5 or DDC5). The C syntax to
set a bit at position is "|=(1<<...)" and to write a zero would be
"&=~(1<<...)". It might look a bit strange the first time you see this
but you don't really have to understand it. Just note it down and copy/paste it
as needed into your program.
So here is the main portion of our blinking LED code:
int main(void)
{
          /* enable pin as output by setting the data direction register */
          DDRC|= (1<<DDC5);

          while (1) {
                      /* led on, pin=0 */
                      PORTC &= ~(1<<PORTC5);
                      delay_ms(500);
                      /* set output to 5V, LED off */
                      PORTC|= (1<<PORTC5);
                      delay_ms(500);
          }
          return(0);
}
You can download the full code at the end of the article as avrledtest.
There are a few things that are strange about this code when you are new
to microcontrollers. The most obvious one is the while(1) statement. All
microcontroller software has this endless loop in main.c. We don't have any operating system
running here and we don't have a need to terminate the program.
The while(1) is akin to an operating system which would step
one after the other through all the tasks/processes that need to be done and run continuously
every task a little bit.
Many people ask also why I always use my own function delay_ms and not
the standard _delay_ms. There are two reasons:
- _delay_ms takes a max value of 262ms. So to delay 0.5 seconds one would
need to write _delay_ms(250);_delay_ms(250);
- the main reason is however that _delay_ms makes the code very fat
and you will quickly fill up the flash memory of your microcontroller just
by calling that function a couple of times.
My own delay_ms uses internally also _delay_ms but just in one place. You can
find the complete code for avrledtest in the download section.
Once you have understood this simple program you will find that much
more complicated applications are not really more complicated. It is all
about reading the state of some IO-pins or changing IO-pins according
to a certain pattern.
How do I compile that code?
The commands to compile this code would be:
avr-gcc -g -mmcu=atmega8 -Wall -Os -c ledtest.c

avr-gcc -g -mmcu=atmega8 -o ledtest.out -Wl,-Map,ledtest.map ledtest.o

avr-objcopy -R .eeprom -O ihex ledtest.out ledtest.hex

avr-size ledtest.out
The first line converts ledtest.c into the object file ledtest.o.
The second line links the objects into ledtest.out. If you have
a project that consists of more than one C-code file then you can use
this to link all the objects together.
The third line makes then a .hex file which can be used to load the
software into the microcontroller.
The last line is to check the size of the code. This way you can
easily detect inefficient code and take action.
Help! Give me an IDE
Integrated development environments are meant to make programming
easer. avr-eclipse is e.g such a solution.
My personal opinion is however that those IDEs just limit you to the
ideas that the developer of this IDE had. It looks like it is
easier simply because it looks nice but in fact it is even more
complicated because you have to deal now with IDE specific settings.
Often you are forced to use a specific editor which is part of that IDE
instead of the editor that you like. Compiling with one button
click can also be achieved by using Makefiles.
In the end it is a matter of personal taste. If you like it then use it.
Here I will however show you how you can have a comfortable development
environment which you will understand then tailor to your needs.
The most important part of a development environment is the text editor.
You want one that supports C-code syntax highlighting.
There are many free choices:
Besides the editor you need a smart way to compile code. Maybe with
just a mouse click
or one command (if you prefer to type instead of clicking). This can be
done by using a Makefile.
AVR studio is an IDE specifically AVR software development. AVR studio is
maintained by Atmel and it is available for Windows only. AVR studio has
an editor, an assembler and a programmer.
AVR studio has no C compiler.
All you can do with AVR studio is call the external avr-gcc compiler.
In other words if you want to program in assembler then AVR studio is quite
OK but if you want to work with C-code then its value is very limited.
AVR studio does not run on Mac or Linux.
Makefiles
Makefiles are just text files containing rules on what to do if a file
was updated. All the needed dependencies are then searched and the corresponding commands
are executed.
The basic syntax of a Makefile looks like this:
# comments start with a hash
#
target:  dependency1 dependency2 ...
<tab> command
The lines after the target have to start with a TAB-character. You can not use space
instead. The top most target in the file should be the main target (e.g
ledtest.hex if that is the main thing you want to have in the end).
The dependency1, dependency2, etc... are the ingredients you need to generate
the target.
So let's apply this to our case.
# our main target:
ledtest.hex: ledtest.out
      avr-size ledtest.out
      avr-objcopy -R .eeprom -O ihex ledtest.out ledtest.hex
#
# now all the small intermediate things that we need:
ledtest.out: ledtest.o
      avr-gcc -g -mmcu=atmega8 -o ledtest.out -Wl,-Map,ledtest.map ledtest.o
#
#
ledtest.o: ledtest.c
      avr-gcc -g -mmcu=atmega8 -Wall -Os -c ledtest.c
To compile the code with a make file you just run the command "make" and make
will search for a Makefile and try to built the top most target. You can
also add more targets that do other things. To execute any target other than
the top most you specifiy its name after the command make. All tuxgraphics Makefiles
contain e.g a load target. You can say "make load" to compile and load the
software into the microcontroller.
Under Windows you can use a batch file to setup the environment and compile.
This makes it then also possible to compile with a mouse click. Just double
click on the batch file:
@echo -------- begin winmake.bat --------

set AVR=c:\avrgcc

set CC=avr-gcc

set PATH=c:\avrgcc\bin;c:\avrgcc\utils\bin

make -f Makefile

@echo --------  end  --------
pause
What are Fuses?
Microcontrollers do not have a Bios where you could set some initial settings.
Things that need to be there before the first line of code is executed are
defined by Fuses.
Those fuses are not like electrical
fuses which you burn and destroy. It is just some bit pattern used for
configuration. You can change it as often as you want. But be careful and read
the datasheet frist. If you change the wrong bits then it can happen that
the microcontroller can no longer be programmed. That means you can not
undo the change anymore.
Most of the time you will use the Fuses to set the type of clock to use.
E.g internal clock or external crystal. What kind of clock speed etc...
If you download code from tuxgraphics then always check the README file
that comes with it for the correct fuse settings. The software will
generally malfunction if you do not have the recommended fuse settings.
To see the current fuse settings for an atmega8 (m8) you would use
the command:
avrdude -p m8 -c stk500v2 -v -q

This will then result in a big printout but the important lines are:

avrdude: Device signature = 0x1e9307
avrdude: safemode: lfuse reads as E1
avrdude: safemode: hfuse reads as D9
The above are the factory default settings for a new atmega8 chip running
on a 1MHz internal clock.
Debugging
Most of the smaller AVR microcontrollers don't support any debugging
features and I personally have never really felt the need for
single step debugging or setting break-points. I think that
the use of in-target debugging is often overestimated. There is a much easier and
more natural way to write good code and find faults if they happen.
A lot of it has to do with methodology. Try to keep the code structured.
Put things that belong together into the same file. Don't use global
variables outside the file where they are declared. Develop step by step.
Write a small function then test it. Expand it and then test it. I never
wite a large junk of code at once. If something does not work then take
a break and afterwards read over the code.
A microcontroller has by default no display. It seems difficult
to guess where a fault might be because you can not easily add printouts.
I put usually an LED in all circuits that I build and that is what I use
to debug the code. It is very simple and it works very well. You can test if
you run through a certain piece of code. You can add an if-statement testing
a variable for its value and then switch on the LED. LEDs have also
the advantage that they do not change the timing. Microcontrollers do usually
directly interwork with other hardware. The timing is usually very important.
Changing the state of an LED is not intrusive at all. It's
a very good debugger.
Code is usually not full of faults. There is usually one specific thing that
does not work and therefore it is just a matter of narrowing down were the fault might
be. An LED is good enough.
What can be difficult to debug with an LED are large algorithms or operations
on strings. Those things are however not hardware dependent. They don't need
to run in a microcontroller. Copy/paste the function in question into a different file and
then change it a bit such that it runs on your PC. Add printf all over the place
and compile it (gcc -Wall test test.c). Now you can see why e.g a URL decoding
function does not work, or an IP packet checksum is wrong,.... Any more complex
algorithm can be analyzed this way. It works very well and is much better
than a debugger.
Many microcontroller circuits have eventually some kind of output. It might
be an LCD display, a web page, a rs232 interface. Those can also be used
for debug purposes.
Writing small and efficient code
In general there is not much difference in writing C-code for a PC computer
or for a microcontroller. The microcontroller is however just a very
small computer. It is therefore important to not waste resources.
To use the right datatype for the purpose is very important.
It is an 8 bit microcontroller so all 8 bit types are very efficient.
Try to use 8-bit datatypes as much as possible:
- uint8_t (same as: unsigned char)
- int8_t (same as: signed char)
If 8 bit is not enough then go for 16 bit:
- uint16_t (same as: unsigned int)
- int16_t (same as: int)
I have never needed any bigger numbers.
If you do some calculation then try to use integer math as much as
possible. Datatypes of float and double really blow up the code.
You can e.g use internally integers even if you want to represent one
digit behind the decimal point. Only when you print it you would
display it with a decimal point. The internal number 100 would then
represent 10.0.
An efficient way to convert an integer into a string for displaying on a
LCD or a web page is the avr-libc specific function "itoa" (in stdlib.h).
This can be used to convert 100 into the string "100". To add a decimal
point is just a matter of adding '.' into the string one position before
the end of the string.
Code examples
Let's get to some more complex C-code examples. Things which are
generic and useful. To really understand the examples I recommend to
read the corresponding chapter in the datasheet (atmega8 datasheet,
pdf, 2846392 bytes)
Code examples: Analog to digital conversion
The atmega8 has a built in analog to digital converter. Here is how
to use it. We use as a reference voltage the internal 2.56V reference.
The ADC has a resolution of 10bit (1024). In other words an adc
value of e.g 500 would correspond to: 500/1024 * 2.56 Volts.
// return an analog value for a given channel. Works without interrupt
unsigned int convertanalog(unsigned cha channel)
{
        // Use the intenal  ref:
        ADMUX=(1<<REFS1)|(1<<REFS0)|(channel & 0x0f);
        // set the clock division factor such that you
        //  stay in the recommended range of 50-200kHz
        ADCSR=(1<<ADEN)|(1<<ADPS2)|(1<<ADPS1)|(1<<ADPS0);
        //  start conversion
        ADCSR|= (1<<ADSC);
        while(bit_is_set(ADCSR,ADSC)); // wait for result
        adlow=ADCL; // read low first !!
        adhigh=ADCH;
        return((unsigned int)((adhigh<<8)|(adlow & 0xFF)));
}


// Copy/paste the above code and to read the voltage on ADC0 pin you would use:

adc0val=convertanalog(0);
Code examples: Timers
Microcontrollers have built in timers and counters. In the first example
with the blinking LED we used just the delay_ms function for the timing.
That is OK if you don't do much other things but for more complex things
you need something like an interrupt that gets executed periodically.
To measure rotations per minute (RPM) you would use a counter. In defined
time intervals you would read the counter and copy its value to a variable.
That variable would then contain the rotations per minute.
It is important to note that you must keep the code executed inside the
interrupt short.
E.g copy a variable or switch on/off something. You can however not use an
interrupt to update a display. Display updates or web-page updates would be
done from the main while(1) loop.
Here is an example the does causes an LED to blink but it uses a timer.
You can download the complete code at the end as avrledtest_timer.
The corresponding datasheet chapter is "8-bit Timer/Counter2".
static volatile uint8_t cnt2step=0;

// this function gets now called in 20Hz intervals
ISR(TIMER2_COMP_vect){
        cnt2step++;
        if (cnt2step>=10){
                if (PORTC&(1<<PORTC5)){
                        LEDON;
                }else{
                        LEDOFF;
                }
                cnt2step=0;
        }
}

/* setup timer T2 as an interrupt generating time base.
* You must call once sei() in the main program */
void init_cnt2(void)
{
        cnt2step=0;
        TIMSK=(1<<OCIE2); // compare match on OCR2
        TCNT2=0;  // init counter
        OCR2=195; // value to compare against 3906Hz/195=20Hz
        // do not change any output pin, clear at compare match with OCR2:
        TCCR2=(1<<WGM21);
        // divide clock by 256: 1MHz/256=3906.25Hz
        // clock divider, start counter (or with WGM21 setting):
        TCCR2|=(1<<CS02)|(1<<CS01)|(0<<CS00);
}

int main(void)
{
        LED_INIT;
        LEDOFF;
        init_cnt2();
        sei();

        // nothing to do in the main loop:
        while (1) {
        }
        return(0);
}
With the function init_cnt2 we configure the timer. After that the
microcontroller will automatically execute the function
ISR(TIMER2_COMP_vect) in 20Hz intervals. Using a variable that counts
up we can reduce the blinking frequency such that we get a nice
blinking LED which goes on and off in 1sec intervals.
Code examples: LCD displays
Good user interface to microcontrollers are small character LCD displays.
Using a small library we can easily print text or numbers. The full code
can be downloaded at the end as avrlcdtest. The zip archive contains also a schematic
drawing that shows how to connect the LCD to the microcontroller.
#include "lcd.h"

int main(void)
{
        // initialize display:
        lcd_init(LCD_DISP_ON);
        // go to position 6 in the second line (1):
        lcd_gotoxy(6,1);
        // write some text:
        lcd_puts("=OK=");
}
The library has more functions e.g for clearing the display or
writing individual characters instead of strings.
Conclusion
This is just to get you started. Tuxgraphics has the source
code available for all projects. You can take it and modify it
to learn or expand it to implement your own ideas.
Those little chips are very interesting and it is a lot of fun.
References/Download
© Guido Socher, tuxgraphics.org
2012-07-17, generated by tuxgrparser version 2.57
![[AVR test circuit on a breadboard]](../../common/images2/article09043/led-test-circuit-breadboard.jpg)
![[AVR test circuit on a breadboard]](../../common/images2/article09043/led-test-circuit-breadboard-2.jpg)
![[avrusb500 programmer]](../../common/images2/article09043/avrusb500.jpg)